The ultimate developer machine
One late December night, I was checking twitter on the phone while was waiting for a large project to build in Visual Studio. What a waste of time, I said to myself hundreds of times already. I had enough of this. Every single moment of the day, I try to squeeze every ounce of productivity: using Colemak keyboard layout, vim for VS and Rider/Web Storm plus all the shortcuts you can use. This year I thought, it is that year when I need to upgrade my rig. For the last eight years, I only used laptops and was happy with that, but I thought it’s time to invest in a powerful desktop. I usually don’t play games, perhaps once in a while. The only resource-draining application is Visual Studio and video rendering. But apart from that, I need to run multiple applications at the same time, like SQL Server, Docker, some Azure emulators. I realised that I’m not happy how slow my laptop became. I set a budget (what a joke) and I went hunting. It took me more than a month to decide what components I want.
Last time I built a PC was more than ten years ago. Too much changed since then, and I wasn’t confident to build it by myself. I wasn’t even clear what parts to chose as I lost track of what’s going on in this industry. Luckily, a colleague of mine is very advanced in this area – thank you Heinrich, and he was my go-to person with all my questions. Initially, I planned to buy all the components through a specialist web site who will build the PC as well. That didn’t work well. I’ve selected all the parts I wanted based on my budget, but a few days later, they called saying that there was a mistake on their website - I need to pay additionally for the motherboard. They asked for half the price on top I’ve already paid for the motherboard. I tried to negotiate. But negotiations, in this case, meant that they insisted that I get a lower price motherboard. Initially, I made a comparison of prices on their website and other websites like scan.co.uk, ebuyer.com, but these websites only sell components and do not build the PC for you. When I compare the new quoted price with the same configuration on other websites, I could save at least £500, but the only problem is I need to build the PC by myself! Building a PC is not new to me, but it is terrifying because I haven’t built one in such a long time, and on top of that, every component is so expensive. It’s enough to fry one component, and you are worse than paying a bit more and get it built for you. But, I found out that some companies offer you insurance for about a month in case you do anything wrong when building a PC. Bear in mind that not all the components are covered. Not sure if that is based on price or something else, but CPU, which was the most expensive part was not included. As an additional benefit, you have the flexibility to buy components from different vendors. For example, it was hard for me to chose a case from the first vendor. The motherboard is XL-ATX factor, and not many cases are compatible with this format. I didn’t like most of the cases offered by the first vendor, and in the end, I chose the best from the worst.
Based on the new arrangement, I could shop around for a better case, no matter if it comes from the same vendor as the components.
Choosing components
If you are overhelmed with plethora of information and don’t even know where to start then start small, step by step, component by component – divide and conquer! And you should start with the CPU because the CPU decision will drive the selection of the motherboard and motherboard is… well, the mother of all the components.
To AMD or not to AMD
When I decided I need a new PC I definitely was thinking I’m getting an Intel because AMD lower prices are paired with lower performance. Historically, if you want a fast rig you go with Intel, if a cheap one you go with AMD. This is not the case anymore. The new generation of AMD Ryzen CPUs is a real contender for even high-end computing compared to Intel but with a lower price. Do pay attention though, because in some cases AMD surpasses Intel on price.
I decided on AMD Threadripper 3960X (Amazon link). Based on tests Threadripper, blows awai Inter Core i9 on multithreaded application, like video rendering. But Core i9 performs better on games and applications targeting single-threaded. I don’t play games so it was easy to decide on Threadripper.
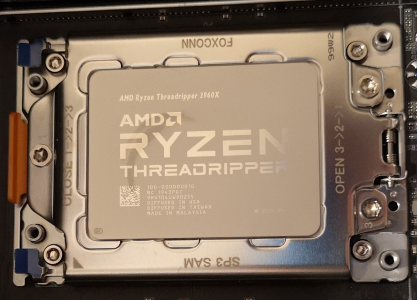
Threadripper is larger than other Ryzen CPUs and that has it’s own issue as explained later.
The reason I went with Threadripper rather with previous Ryzen Gen is that Threadripper is based on the new TRX40 platform on sTRX4 socket when Ryzen is based on AM4 socket . Rumours say, that it’s very likely that AMD will not produce anymore AM4 after 2020 so buying one of this will force to upgrade the motherboard when upgrading the CPU.
Motherboard
TRX40 is a new line, so I didn’t expect many options for motherboards. I decided to go with Gigabyte TRX40 Aorus Xtreme (Amazon link) because of its dual 10GB LAN and other specs like 4 NVME PCIe 4 M.2 Connectors. Some features, like NVMe RAID Adaptor I doubt I’m going to use. And in general, you can’t go wrong with this motherboard.
Cooler
Threadripper CPU is larger than previous Ryzen generation, so previously released coolers are incompatible. But you don’t need to cover the entire CPU just the central part needs heat dissipation.
Initially, I was set for Cooler Master Wraith Ripper, but after more research, it came up not as good and promising. Next on my list was CPU from Noctua – they are good, but I didn’t like the look. Also, there is a range from be quiet! but they could not confirm the compatibility with Threadripper.
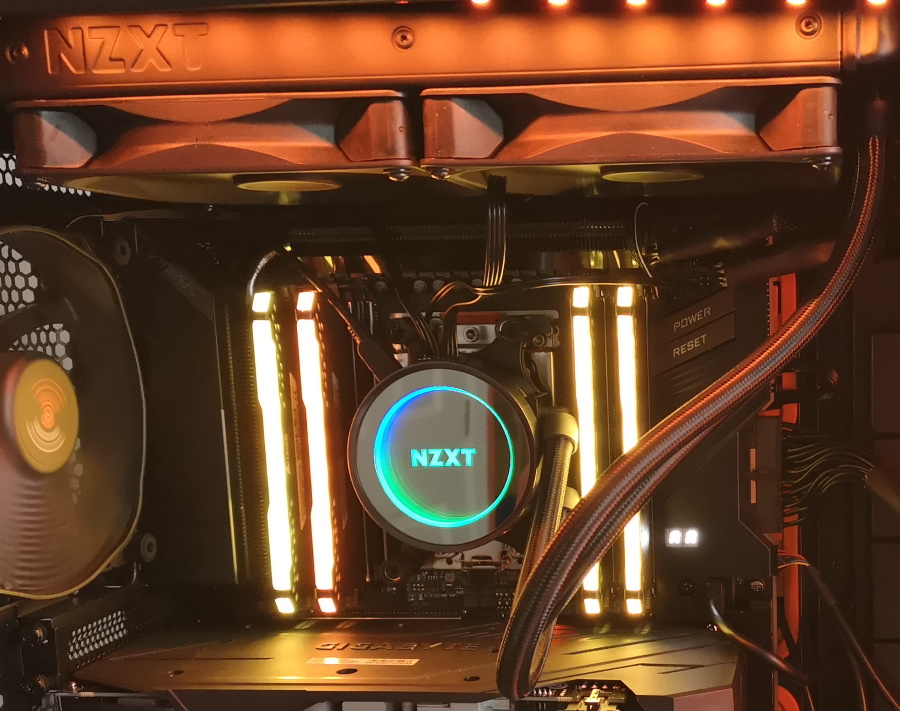
I settled on NZXT Kraken 62 (Amazon link). I don’t like fan liquid cooling because the pump can fail and you can’t see that visually. Hopefully, the software can successfully catch that. I also set the RGB colour to match the CPU temperature, which is a helpful indication of your CPU workload. The pump and the fans are quiet, which is nice.
Memory
I bought Corsair Vengeance RGB PRO Black 64GB 3200 MHz DDR4 Quad Channel Memory (Amazon link). Initially, a planned for no RGB version but it was out of stock for a week or so. The difference was in 20 quid so I didn’t want to wait a week and I’m glad I didn’t. Togher with the cooler and the motherboard you have a pretty lovely rainbow of colours.
The motherboard has 8 slots, so I filled 4 with 64GB. Currently, my day to day activity takes around 40% of the memory, so I think I still have time until I need to fill in the other slots.
Make sure you read your motherboard specification and check the list of the compatible suppliers. It could work if you use memory which is not in your motherboard list but why taking chances.
The downside of the RGB in my case is that when the PC goes to sleep, they are not switching off. I changed the BIOS settings to switch off when in sleep mode, but it only works for the motherboard LEDs. I hope that with a new BIOS update they will fix the issue. A solution I found is instead of sleep use hibernate.
Hard Drive
You always run out of space, always, no matter how big the hard drive is. This time I decided to buy the biggest I can find and the fastest. Most of the time, the hard drive is the bottleneck of your system’s performance. Every time I look at the Task Manager, HDD is hard at work, with most of the time at least 20%.
2 TB, PCI 4, Gen4 M.2 NVMe – this was on my mind. I didn’t have many options, and I got Seagate FireCuda 520 2TB M.2 PCIe 4.0 NVMe SSD/Solid State Drive (Amazon link).
So far, I don’t regret an ounce of it.
GPU
I would say there isn’t much to say and at the same time so much! There are too many options, and you end up spending so much time on research. But my requirements for a GPU are not very high.
I bought Gigabyte NVIDIA GeForce RTX 2070 WINDFORCE 2X 8G Graphics Card (Amazon link) after some research. It is not the best video card but it is a really good one. I don’t play games (I do try them once in a while), only do video rendering, so that is more than enough. A 20 minutes video encoding in Adobe Premier took around 2 minutes. On my old laptop, the same video takes around 14 minutes – it’s a massive bust in productivity.
It also supports ray tracing and I may start liking Minecraft graphics. If you don’t know what I’m talking about check youtube for Minecraft and raytracing.
Power supply
You don’t need anything fancy, just enough power and silence. Corsair is a good choice for this, so I bought Corsair 850 Watt RM850x Fully Modular ATX Power Supply/PSU (Amazon link).
I wish I had invested a bit more time in researching this and buy separate cables at least for the motherboard connection as you would see later, I had a bit of an issue with the cable management in the case. Also, a bit of orange or green colour on the cable would make it look better.
Case
The motherboard I chose is XL-ATX format which is a bit of an issue in terms of choosing a case. You get many options for ATX. Chose something larger than that and you are out of options. Most of the XL-ATX cases look ugly, really ugly, just like a wardrobe. The one I liked from “be quiet!” is one of the best designed on the market for this form factor. But the case is enormous, only if I could understand the size of it before buying.
Orange Dark Base PRO 900 rev2 Full Tower (Amazon link) – supports or better say is compatible with XL-ATX. It means that you can fit the motherboard. The problem is that the holes for the cables on the side become small as the motherboard covers most of it them. I struggled to get the motherboard connection cable to go into that small space so, in the end, I decided to keep the cable in front of the motherboard, not to get it wired through the back. I could have managed to get it through the small gap if I tried harder, but I didn’t want to force the cables as I don’t know how it affects the cables and the connection in the long run.
I like the case, it has good airflow, designed well, and it is quiet! My laptop fan makes more noise than three fans on the case. It is designed is such a way that it makes the assembly very easy. You remove the interal part where you attach the motherboard. You add all the components on the motherboard and after that you add it to the case. This avoids the hassle of adding the motherboard inside the case and mount all the component inside the case. The case comes assembled with the tempered class on the left if you look at the case from front side. I wish they had a smaller case. The motherboard will fit in a smaller one, and there is a considerable amount of space in the front part where you can fit an uncountable amount of hard drives. I’m wondering who is using HDDs (not SSDs) these days. HDD for backup is an option, but a NAS does the job better. Perhaps I will find a proper usage of this space and HDDs.
The fun and scariest part – Building
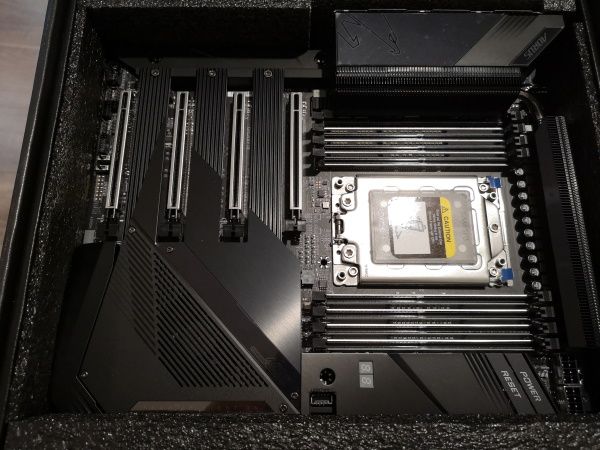
All of these need to go inside
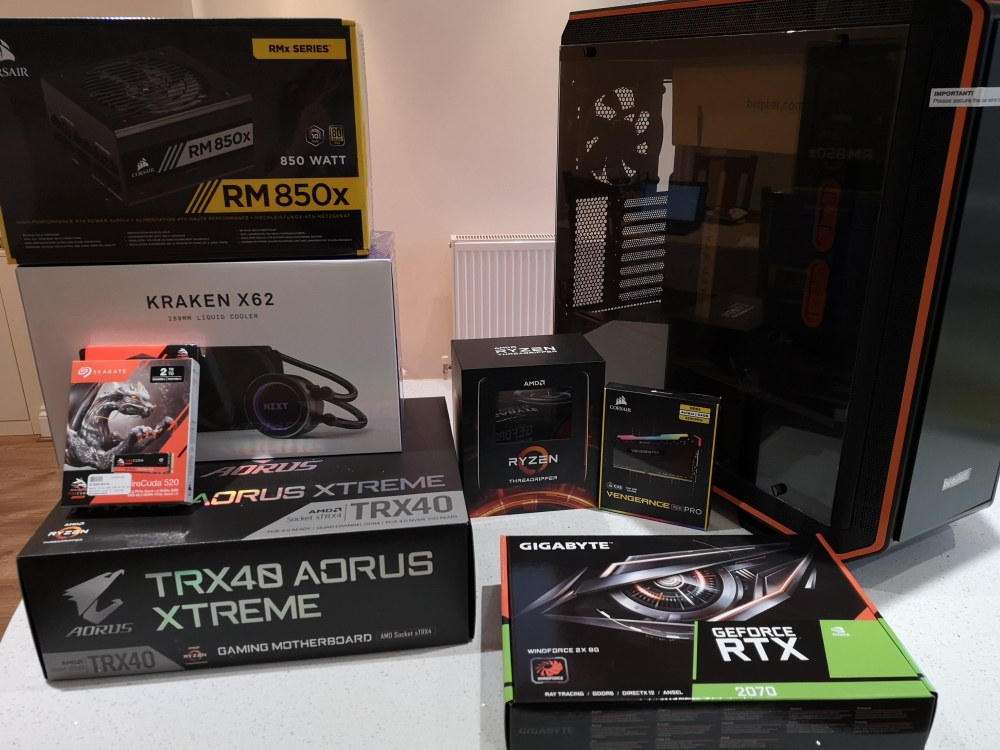
First of all, as I mentioned, I bought insurance, so if I screw up, I’m able to replace the component for free. The best advice I can give is to be well prepared: read your motherboard manual, watch videos, recommendations. Before you do anything, figure out what you need to do and how to put components together. Pushing the memory into a slot is one thing and applying a thermal paste to a 1K CPU when the cooler doesn’t cover the entire surface of the CPU is a different thing. What happens if you applied to much paste? Do you have anything handy to clean it and start over? What material is it made of? Is it antistatic?
My motherboard has eight slots, but I have only four RAM sticks. Not any four slots can be used; the recommended four slots should be used.
Testing performance
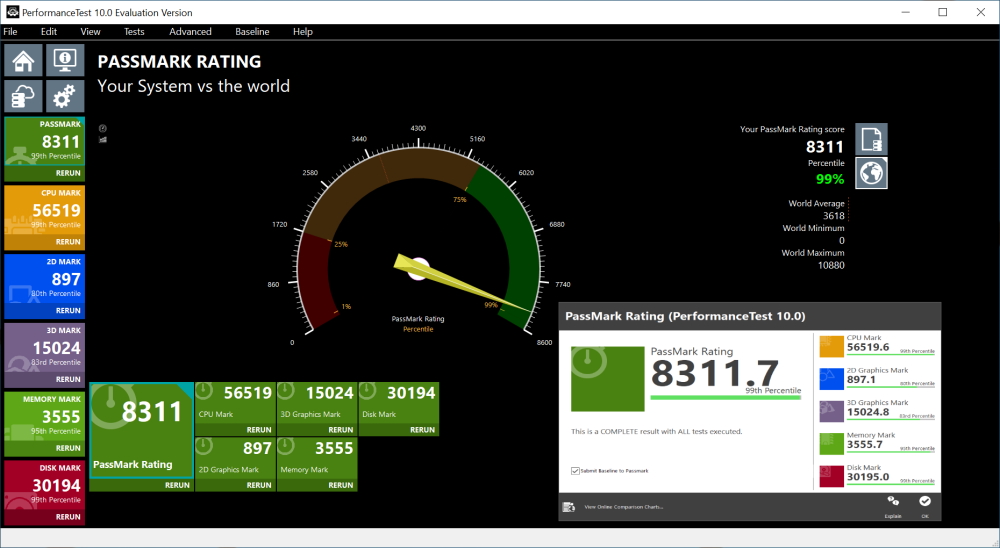
You invested much time in research and spend money on components; you’d like to know how performant your PC is. One software you can use is PassMark. It runs an extensive set of tests on all the computer components and compares it with benchmarks run by other people.
I ran my tests immediately after installing windows (in February) and wasn’t happy with the result. The benchmark score was 5,903
It’s a good score but not what I would expect from my configuration.
I didn’t have time to analyse how I can improve it at that time. Later, I changed the memory frequency to 3200MHz (changed the XMP profile). Updated all the drivers and rerun the test. This time the score was over 7000, but the hard drive score went down from 33,000 to 19,000. The reason was that I had copied 1TB of my images collection to the hard drive. This version of hard drive doesn’t show its performance on small size files. The significant performance comes when you need to deal with large files, like video files.
I deleted all my photo collection and reran the tests. This time the PassMark score was better – 8,312.
Still, I didn’t get the hard drive performance as good as the first time, but I didn’t bother do delete all other files, like .net projects, npm packages, and other small size files.
Here is the full list of components for your convenience
You can hear how silent the machine is