Continuous Integration and Deployment of Azure Web App using VSTS / VSO
A new addition to the Microsoft’s Visual Studio Team Services (former VSO) continuous integration and deployment is the Release tool. The CI/CD process I’m describing here applies to VSTS but at some point it will be released to TFS as well. Microsoft invested its effort into building a nice continuous integration and deployment pipeline. The new online VSTS build and release tools are much better than the old XAML builds. I have been working with TeamCity for a very good number of years and I was surprised with Microsoft’s new addition. I started working with Build and Release tools very earlier for one of our clients - since private previews. It was called Visual Studio Online at that time. My experience is that they are moving very fast. I ported a few of our TeamCity builds and deployment configurations over to VSTS and it was easier than I expected. Taking into the account that I almost had zero documentation I progressed very quickly.
In this article I will explain how you can build and deploy a Web site into Azure Web App. VSTS contains a template for Azure Web Sites which makes our life easier. It contains Cloud Services and IIS Web Applications also. And if there’s anything you need which is missing you can always use PowerShell.
The solution we’re going to deploy represents an ASP.NET MVC Application but a WebForms application will have the same approach. For the sake of simplicity I created an ASP.NET MVC Application and named it OfficeInventory.
Create a build configuration
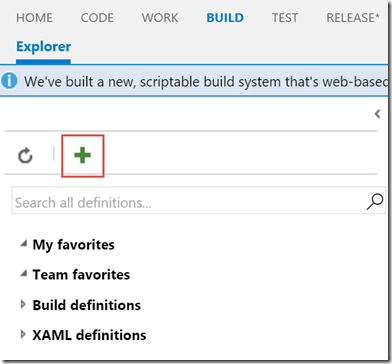
Open Build tab in VSTS and click the plus button:
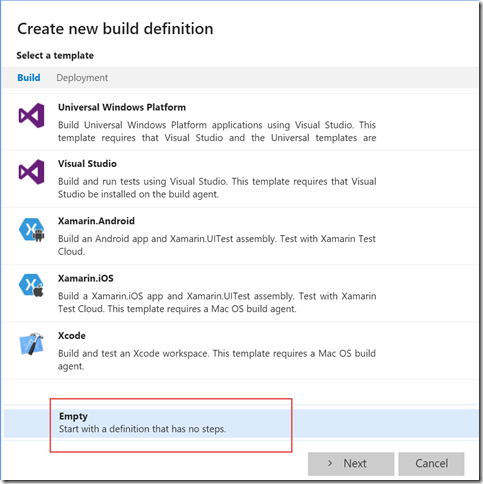
Select an Empty template in the popup windows and click Next. There is a Visual Studio Template but it will add build steps which we don’t need, like Visual Studio Test and Index Sources.
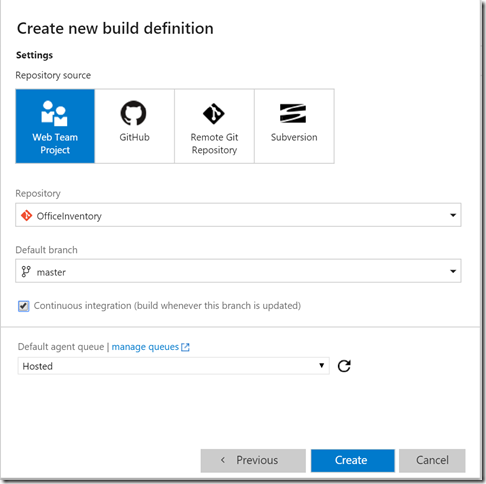
In the next step select the source settings. Default agent in this case will be Hosted, unless you’ve installed your own agent. With the hosted agent you have 240 free minutes per month. Check Continuous Integration check box and click Create.
First we’ll configure the build and after that we’ll add build steps.
Repository configuration
We’ll come back and update the build and publish build steps but for the moment open the Repository tab. You should have already source settings in place. The settings I’m explaining below refer to a Git repository. If you want the build process to download all the source code every time it builds select true for the Clean dropdown. Depending how big your project is this may slow down the build process. If you want to tag your source code then select the appropriate value in the Label sources. Adding tags to you build will make sense when you create NuGet packages but it will provide less information for normal builds. By default Label format contains the build number. I will explain later how to set it.
Variables configuration
The Variables tab contains our variables definition we can use during the build process. We can use them in the following format:
$(VariableName)
Let’s add the following variables:
| BuildConfiguration | Release |
| BuildPlatform | Any CPU |
Triggers configuration
In the Triggers tab we can configure when to run the build. You can set it up to run as Continuous integration and include filters based on branch names. When you check Batch changes option it will include several check-ins if they are from the same committer. You can run the build on a schedule as well. Adding the schedule will help when you want to run builds which takes more time, like testing.
General
In the General tab you can change the Agent Queue, build authorisation, badge displayed on external web site etc. We’re interested in setting the Build Number.
I like setting the build number following the classic approach: major.minor.build.revision. In this case, if I want the build number to be 1.0.3.[RevisionNo] then I use the format 1.0.3.$(Rev:r). If you prefer to use a different system to name your builds, like using date, then find more information online at this MSDN link.
Retention
The Retention tab allows to specify for how many days you can keep the build details, including test results. The default value is 30 days and at the moment you can’t change that.
Build steps
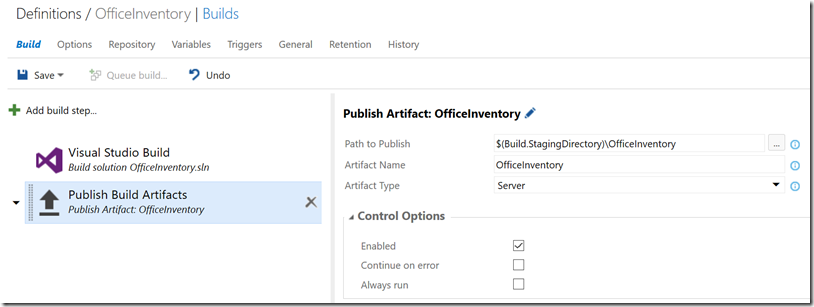
We have created an empty build, now lets add the configuration we need. Click Add build step… in the list of Tasks select Build on the left hand side and search for Visual Studio Build. Click the Add button. Next select Utility on the left hand side and click the Add button of the Publish Build Artifacts. Now you can close the popup.
Build solution
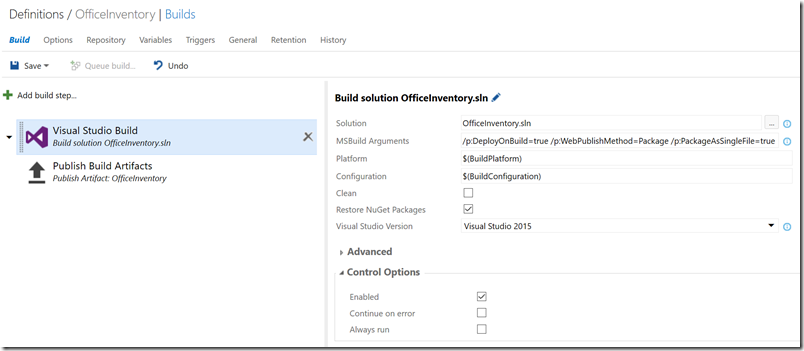
Let’s go back to the Build tab and select Visual Studio Build. We need to provide settings on the right hand side. First of all, you may want to add a meaningful name to this step, so click on the pencil in the right hand side, above all the settings and enter the name you want.
The Solution text box contains **\*.sln – you can leave it like that or click on the ellipsis button and select the solution file from the tree.
MSBuild Arguments – we need to create a package which we’ll deploy later in Azure Web App. In order to do this we’ll use the command line
/p:DeployOnBuild=true /p:WebPublishMethod=Package /p:PackageAsSingleFile=true /p:SkipInvalidConfigurations=true /p:PackageLocation=$(Build.StagingDirectory)\OfficeInventory
Pay attention to the PackageLocation parameter. This is where our package will be copied. We’ll use this path in the next step to publish the package. We use Build.Staging variable which is a predefined build variable. The package will be copied to staging directory of our build and in the OfficeInventory folder. The staging folder is generated by the build agent. Find more information about build and release variables at Use variables.
For the Platform and Configuration provide the variables we’ve created before: $(BuildPlatform) and $(BuildConfiguration).
Check the Clean checkbox if you want to start the build with all the files removed from previous builds.
Publish package
The next step is to publish the package so we can use it during the Release process. Select the Publish Build Artifacts step. In the Path to Publish enter $(Build.StagingDirectory)\OfficeInventory. For the Artifact Name provide a name you want. In my case it’s OfficeInventory. In the Artifact Type select Server unless you want to copy the package to a shared folder.
Now it’s time to save if you haven’t yet and run the build.
Release
Open the Release tab. As I’m writing this blog the Release is in public preview.
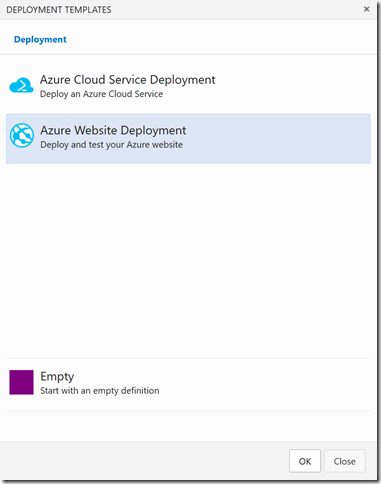
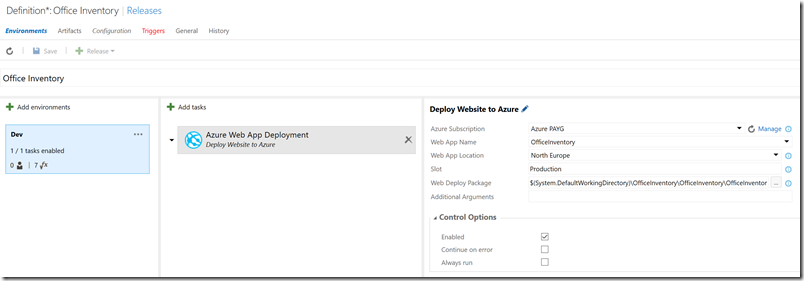
Click on the Plus button and select Azure Website Deployment. It will add a new environment with Azure Deployment and Visual Studio Test tasks for that environment.
Delete the Visual Studio Test because we’re not going to configure it – I will post another article about configuring Unit Testing.
You can rename the environment if you want to. Usually you’ll create a few environments, like Dev, Testing, Staging, etc.
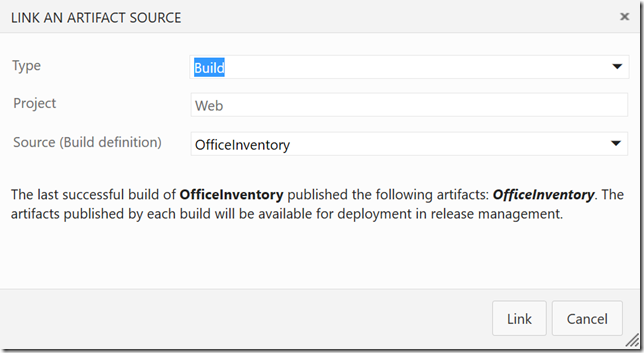
Click on the Artifacts tab then click on the Link an artifact source. Select the build you want to link to. There is nothing to add on the Configuration tab so click on the Triggers tab. Check the Continuous deployment and select the artifact and the environment. In the General tab I will change the default name format to Office Inventory - 1.0.0.$(rev:r)
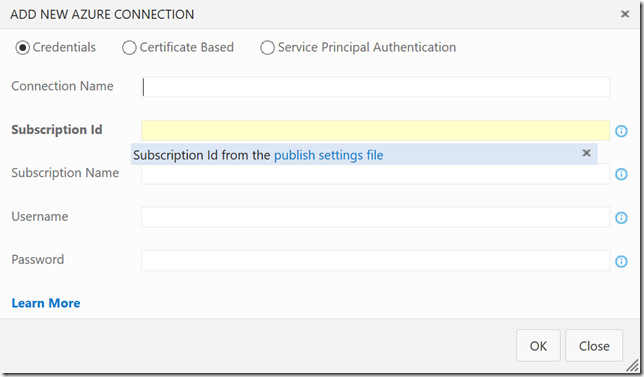
In order to deploy to Azure you need to configure the Azure subscription first. Click on the Manage link on Azure Subscription of the Azure Web App Deployment task. This will open a new page. On that page click on the New Service Endpoint and Select Azure from the list. This will open a modal windows where you need to enter Azure details. The easiest way to get that information is hovering you mouse on the exclamation icon and click on the publish settings file link. That will download the Azure publish settings file. That file is an XML file so open it in your favourite editor. I prefer to use Certificate Based instead the Credentials type because I don’t want people to enter their credentials. In any case, extract the information you need from the publish settings file, like Subscription Id, Name, etc. and click OK.
Let’s go back to the Environments page and click on the Refresh button on the right hand side of the Azure Subscription. Enter the name of your Azure Web App, select the location and the slot (Production or Staging). Click on the Ellipses button select the package.
Now we’re ready to deploy. Save the release and click on the Release button and next Create Release.
NOTE: You can rename the Tasks if you click the pencil on the right hand side of the task Title.
Now you can add multiple environments and continuously deploy to them.
